| Written by steve kupper | |
| Sunday, 08 March 2009 | |
|
Use DOT 3 brake fluid. Use only brake fluid that has not been
opened. Brake fluid absorbs moisture, moisture boils before brake fluid,
boiling water does not stop 2002s.
Three pints should be on hand to change out the brake and clutch systems.
Three methods discussed.
Gravity
1. Fill the reservoir, open the bleed screws and let the brake fluid leak everywhere overnight.
Old fashion way - need a partner or helper.
1. Protect the area around the reservoir, brake fluid removes paint, unpainted metal rusts.
2. Fill the reservoir with fresh brake fluid.
3
Start at the right rear. Get a big bottle with a hose to it. The hose
needs to be the size that will fit tightly over the bleeder screw. Here
is what I use.

The
bottom of the jug should have some fluid in it. Keep the tube submersed
in the old fluid to keep air from being sucked back into the system.
4. Put the closed end side of a 8mm or 7mm wrench on the bleeder screw then put the hose over the bleeder screw.
5. Ask your helper to get in the car, pump the brakes slowly five times and on the fifth time hold to the floor.
6.
While the brakes are held, quickly release the bleed screw a bit and
watch for bubbles. Quickly close (after counting one-thousand one one
thousand two) the bleeder screw and tell the helper they can release the
brake. Get this sequence absolutely correct. Pump, Hold, Release and
close the bleeder screw, then and only then, release the brake pedal.
7. Repeat the process until you do not see any bubbles. Use a good light near your work so you can see the bubbles.
8. Keep checking the level of fluid and top off as needed.
9. Repeat the process on the driver's side rear.
10. Now move to the passenger's side front. Bleed in the same manner in the sequence of Upper, Inner and Outer (UIO)
11. Move to the driver's side and bleed like the passenger's side front.
12. Always checking the level of fluid in the reservoir and topping off as needed.
Power Bleeder method.
1. Same as the old fashion method but you need a power bleeder and the helper can go fix dinner.
2. Fill the reservoir.
3. Attach the power bleeder to the reservoir and pump to 10-15 psi.
4.
Bleed as old fashion way, (no pumping the brake pedal with the power
bleeder) keeping an eye on pressure and fluid in the reservoir.
Note: some folks fill the bleeder with fluid, I do not.
I guess there is another way but I do not know how to do that. That method uses a vacuum tool like a Mighty Vac
Brake fluid is nasty stuff, clean up real good and through away the rags or wash them good before you reuse.
|
Saturday, September 29, 2012
Bleeding the E21 Brakes
Bleeding your Clutch
| Written by BillWilliams | |
| Sunday, 08 March 2009 | |
| Mike taught me a way to bleed the clutch system on a five speed that makes things pretty simple.
Get a pump type oil can from your local hardware,dedicate it to
brake fluid. Put a section of tubing on it that fits the spout on the
oil can and the bleeder screw.

Fill
the can with your favorite brake fluid, connect the tubing to the
bleeder screw, crack the bleeder screw open and start pumping.
Have an assistant watch your reservoir to let you know when the reservoir is full and no bubbles.
Close the bleeder screw.
Bob's your uncle.
|
M10 Carb Installation
| Weber Downdraft Carburetor Installation Guide |

|

|

|
| Written by Glenn Stephens and Rob Shisler | |
| Saturday, 03 September 2005 | |
|
Introduction:
This article deals with the most commomly upgraded-to '02 downdraft
carburetors, the Weber 32/36 and the 38/38. The carbs are named for
their throttle diameters in millimeters. The 32/36 is also a sequential
carb, meaning that first the smaller 32mm throttle butterfly opens,
then as the throttle is opened further the second, 36mm throttle opens.
On the 38/38, both 38mm throttles open simultaneously, giving smoother
overall response and more power.
Choke Types:
There are three popular types, designated by the : manual choke (designated
by the model suffix DGx), water choke (DGAx), and electric choke (DGEx).
Because fuel does not atomize well when the motor is cold, the choke's
purpose is to enrichen the mixture during those cold starts by cutting
off the supply of air. On the 32/36 and 38/38 downdraft this is accomplished
by the square butterfly valves at the top of the carb inlet. The throttle
plates themselves are at the base of the carb.
Manifolds:
Manual Choke: The manual choke has a cable-actuated mechanism allowing the driver to manually set the amount of choke they need for cold startup. Many people prefer them for their simplicity and the level of control. When installing or adjusting a manual choke cable, obviously the idea is to allow for a full range of movement of the choke plates, from wide open to snapped shut. The only connections to a manually choked carb are a vacuum takeoff for the distributor (optional), and the choke cable itself. There is a kit available to retrofit the 32/36 either electric or water choke with a manual control, and this kit also works with the 38/38. Water Choke: The water choke is semi-automatic. To activate it, you depress the accelerator all the way which causes the choke cam to catch with the butterflies closed. Water from the engine block is run into the choke housing which heats the mechanism and allows the choke to open as the engine warms up. The water choke requires a small water hose to the engine block and the manifold. There are an optional electrical connection to a solenoid which goes to a temperature sensor in the manifold, and a vacuum port for the distributor. Electric Choke: The electric choke is essentially a timing circuit made of a bi-metal coil attached to the choke pivot. When you turn on the ignition on a cold morning, the choke is normally closed. As the electricity begins to heat the coil, it slowly contracts and opens the choke plates. Thus it is important to avoid leaving the ignition on on a cold morning without starting the car because you will open the chokes without realizing it, and thus make it harder to start when you finally do try to start it. The electric choke requires, not surprisingly, a 12-volt ignition-switched and fused source. The easiest places to get + 12v for a car not normally equipped with an electric-choked carb is from the + side of the coil, or from the #12 fuse (later 12-fuse cars) or #11 fuse (early 12-fuse cars) or the + terminal of the coil. There is a vacuum advance port for the distributor (optional). To adjust the electric choke, with the air cleaner off and the car cold, loosen the 3 screws surrounding the plastic cover of the electric choke mechanism. Rotate the plastic cover until the choke butterfly valves are just closed. This is the choke position. Start the car and get it to idle. As the choke and the car warm up, the butterflies should open to a straight up position - takes about 5 minutes. If they open all the way, then tighten down the 3 screws and you are good. If not, turn the plastic cover until they are straight up, then tighten.
There were two types of double-barrel manifolds that originally came
on '02s: the "Peanut" manifold and the regular two-hole one.
These were both designed for the 32/36. In addition, there was a performance
manifold made for these cars back in the day by Cannon for people who
upgraded to 38/38s or 40/40s. This manifold was "Hogged" out
so that instead of two seperate holes, or a single peanut-shaped hole,
there was a single large oval hole for better airflow. It is pretty
easy to make this modification to either of the stock-type manifolds.
Any type of carbide metal cutting tip for a die grinder will do the
job, or a jigsaw/carbide grinder tip combination. Just cut the basic
shape clean with a jigsaw (make sure the blade wont bottom out inside
the manifold!) and then use the carbide grinder to clean up things.

"Hogged" intake manifold and stock two-hole.

Stock "peanut" style manifold.
Manifold Connections: The manifold has two large water inlets, one the bottom and one on the firewall side. These are used to circulate water through the manifold which are designed to help with fuel vaporization during engine warm up and in cold weather. Hot-weather enthusiasts often just bypass them, but early-risers who have to drive to work in the cold would do well to keep them connected. Typically there is also a small water nipple on the end of the manifold that is used as one of the connections for a water choke. In other applications you can cap this with a bolt and copper washer or run a hose to the connection on the rear of the engine block. There are lots of little nipples on the later manifolds used for vacuum connections for the emissions systems. Again, depending on your local smog laws, you may want to remove all that stuff and block them off with rubber caps or plugs. There is a large nipple that should be connected to your brake booster with a check valve in the middle. The valve should be situated so that vacuum can be held in the booster after engine shutdown. Between the 3rd and 4th intake runner is a threaded hole where the sensor for a water choke solenoid can go. Other applications can remove the sensor. On the bottom of the later manifolds is a temperature switch which is used for emissions. It is a wet connection so if you are desmogging, either leave the sensor unconnected or plug it with a bolt and copper washer. 
Later-model Emissions Loom that is replaceable by
single wire from #12 fuse to + side of Coil.
To remove the manifold, disconnect all the hoses and remove the 12mm nuts from the studs. There is another bolt that attaches to the starter. There is no need to pull the starter. Some of them are tough to reach but just be perisistent. LABEL all the wires and hoses you intend to keep, and once they and the fasteners are removed, the entire manifold/carb assembly will pull right off. Linkage: Most carb kits come with a proper linkage for your vehicle, but you may find yourself adapting your old linkage or using or making your own cable linkage. 
Stock-style rod linkage installed on 38/38 carb.
For a stock shaft-style linkage, adjust the throttle control shaft (carb to firewall shaft) so it is level and straight - inline with the carb. This is done with the pivot bracket on the firewall. Then adjust rod end (on rod coming up from pedal box to control shaft) to achieve full throttle opening when depressing gas pedal. You can look through the windshield at the rear of carb to confirm full opening. Place the spring as shown with the long arm down and hook toward the engine bay so that it does not catch on the heater hose. 
Rod-type linkage at firewall.

Rod-type linkage at carb.
If you are replacing the stock shaft linkage with a cable setup, Rob suggests making your own from commonly-available bicycle cable parts and perhaps some hand-made cable "stays." What you need is about two feet of cable including the shroud (get high-end teflon-lined cable), two metal brackets that you can make yourself, and two adjustable cable housing retainers such as you find at the end of the cable shroud on a bike brake cable, for example. You will also need the two cable clamps that hold the actual cable itself to the end of the lever arm attached to the throttle pedal, and the one that attaches to the throttle mechanism on the carburetor itself. 
38/38 Carb and Cable Linkage Detail

Fuzzy pic of Lower Cable Stay Bracket.
The lower cable stay is bolted to brake booster bracket via the large
main bolt that holds the upper pedal box "arms" in place.
A simple 90-degree angle and hole set the cable end above the arm attached
to the throttle pedal. You will need a similar type of rotating cable
end clamp to fit in the hole at the end of the throttle arm as you have
for the throttle mechanism at the carb itself. Please note in the picture
of the lower stay (above) that the cable exits the lower stay at a severe
angle. This is the way the thing was installed in my parts car, and
it, among other problems, caused severe binding.
When I moved the cable setup to my project car, I fixed all these details and "tuned" the operation of the cable (shortening it, and chamfering the outputs of the cable housing end holders) itself so that only the carb spring itself would pull the cable up and close the throttle. I also actually used two more springs (one at the pedal box and an additional one at the carb) as failsafes, however, but its nice to have a nice, smoothly operating cable without any binding. Overall, the kit produced by a well-known Southern California (non-'02-specific) performance tuner that I inherited in my parts car, and its subsequent installation by a well-known local independent BMW shop, were of such alarmingly poor quality that the throttle would often bind up and not close fully even with ALL THREE springs installed. No more of that! Jetting and Tuning:
First let me (Rob) ask everyone who knows what their
carb setup is to PLEASE email your jetting, cam, compression, exhaust
system, and displacement information, as well as comments about how
the engine performs, to
Tom Kent
,
who is the FAQ site's Jetsmaster. He is compiling a database of various
setups and we would like to include this information in an appendix
to this article for reference purposes (obviously). Its YOUR help in
this that makes this site work the way it does. THANKS IN ADVANCE!!
Carbs must be jetted to match the performance characteristics of your
other engine and exhaust modifications (compression, header, cam, etc.)
There are 3 kinds of jets on a downdraft Weber: Idle, Main, and Air
Correction Jets. The idle jet can be changed easily but main and air
correction jets require you to unhook the choke lever (small circlip),
remove the 6 screws on top of the carb, and pop the top. 
Idle Jet Location for Weber Downdraft Carbs

Main and Air Jets Locations Inside Carb Assembly
Tuning a carburetor can be a maddening and very rewarding experience. As of this writing, we can only offer advice on how to diagnose and suggestions on how to tune your Weber downdraft. Eventually, the FAQ will have the aforementioned Setup Database that will allow you to simply match your engine/exhaust specs to a table, and chose the Jetting setup that looks like the best match. Of course all engines are different, but this will help to give a lot of people a head start in fine-tuning their performance. Understanding how to tune a carburetor begins with understanding the basics of air-fuel ratio as it relates to car engines. Gasoline vapor burns most efficiently at a ratio of 14 parts air to one part of fuel. This "ideal" ratio is often referred to as "Lambda." However just because this is the most efficient ratio, doesn't mean it is the TRUE ideal for your particular application. Modern fuel-injected cars often run at VERY lean settings of 16:1 or more while just cruising along, but can also instantaneously adjust themselves to much more powerful settings of as little as 12:1. (More fuel per unit of air produces more power, up to a certain point). With carbureted cars, this level of electronic adjustability isn't available so we have to set up our cars based on our usual driving style or, for enthusiasts, to produce the most power (or some trade-off therein). It is important to know that a carb that is running too lean will tend to "race" or "surge" as you accelerate through the powerband, whereas one that is set up to run too rich will tend to "bog" or "stumble." Knowing those characteristics will help you to diagnose and tune your own setup. If your carburetor was shipped from a dealer that knows '02s, it is highly likely that it is set up for at least a stock '02 configuration. This can provide you with a good baseline for making subsequent adjustments. Certain vendors can in fact set up a carb based on their experience for whatever setup you happen to have in your car. Carbs "rescued" from a junkyard, e-bay, etc., however, may have been set up for any number of different situations and may require extensive tuning. Furthermore, enthusasts who change other aspects of their engines' performance hardware will always want to re-jet for the new changes. 
Proper kink-free installation of Fuel Line from stock
Mechanical Fuel Pump
What follows are links to several online sources of MUCH more extensive info on how to tune a carburetor for various setups. Also please note that the FAQ Store now carries a full line of NEW Webers, parts, jets, RamFlo Air Filters, etc., at super-low prices, and the profits from any sales help to keep the FAQ site going! And, as always, if you have any questions or comments, please feel free to post them to the Message Board! |
Friday, September 28, 2012

Saturday, September 22, 2012
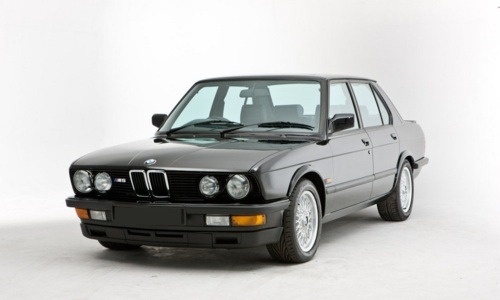
A Dream: E28 M5
E28 M5 / M535i - 1985 to 1987

What makes the E28 M5 unique?
The E28 M5 is the BMW Motorsport-developed version of the E28 5 Series. It uses the M88 or S38 twin-cam 24-valve inline-six first introduced in the M1. It also has a BMW Motorsport-tuned chassis and a few special cosmetic pieces.
Where was the E28 M5 first introduced?
The M5 debuted at the 1985 Amsterdam Motor Show.
Where was the E28 M5 built?
Unlike the other E28 5 Series models, M5s were assembled by a small group of BMW Motorsport technicians who mated the drivetrain and interior trim with pre-painted bodies transported from the Dingolfing factory. This hand-assembly took place in one of two facilities, depending on the production date. E28 M5s produced before September of 1986 were assembled at BMW Motorsport’s original Preussenstrasse location near the BMW AG headquarters in Munich, while E28 M5s built beginning in 9/86 were assembled at the newly-opened BMW Motorsport headquarters in Garching, roughly 100 kms (60 miles) east of Munich. The only exceptions were M5s produced for the South African market, all of which were assembled at BMW’s Rosslyn, South Africa factory from German-supplied Complete Knock Down (CKD) kits.
Why was BMW sued by American E28 M5 owners?
When BMW of North America first anounced the E28 M5 in late 1986, production was said to be limited to 500 cars. But by the time production ended in November 1987, however, almost triple that number had been produced. Thus, a class action lawsuit was filed against BMW by E28 M5 owners who claimed that the collector’s value of their cars was diminished by the greater volume. The company settled the case by giving these owners a rebate on the purchase of a new BMW.
Why are all North American-spec E28 M5s officially 1988 models if the last example was made in 1987?
This was most likely a marketing decision. With the M5 originally intended to be a limited edition of 500 cars, and with the entire E28 range due to be replaced by the E34 for 1989, perhaps BMW of North America wanted to keep the E28 M5 exclusive by offering it only for the final 1988 model year. Also, it is worth noting that production of the other 1988 5 Series models began in early 1987, so the M5 preceeded these by only a few months.
Why are all North American E28 M5s essentially identical?
Because the E28 M5 was hand-assembled, yet needed to be manufactured for the North American market in relatively large numbers within a relatively short amount of time, BMW of North America was forced to limit the model’s specification to just two color schemes: Black (086) with a Natur (tan) leather interior and (officially for Canada only) Black (086) with a black leather interior.
Why is a North American E28 M5 with a black leather interior so rare?
Though a Natur (tan) extended leather interior was the only official interior color choice for the U.S. market, Canada insisited on giving E28 M5 buyers the second option of a black extended leather interior. The black interior option was later expanded to the U.S. market at the very end of E28 M5 production. In total, 102 E28 M5s with a black interior were produced for North America, of which 72 were built to Canadian specification and the rest to U.S. specification.

Production Data
How many versions of the E28 M5 were developed?
BMW Motorsport built four different versions of the E28 M5, three at the M works in Garching, Germany (European-spec in left-hand drive and right-hand drive, plus the North American version) and a South African-spec model for the home market assembled from Complete Knock Down (CKD) kits. Only the North American version utilized the catalyst-equipped S38 version of the M88 motor.
How many of each version were produced?
ECE (LHD without catalyst): 588 produced from 10/84 through 9/87
ECE (RHD without catalyst): 187 produced from 3/86 through 11/87
NA (LHD with catalyst): 1,340 produced from 11/86 through 11/87
SA (RHD without catalyst): 96 produced (assembled from CKD kits) from 6/87 through 11/88*
*Dates shown indicate final completion of vehicles assmebled in Rosslyn, South Africa.
What changes were made to the E28 M5 during its production?
Though all North American-spec E28 M5s are essentially identical, there were some alterations to the European-spec E28 M5 that occurred over the course of its production. These include:
-Change from “M” shift knob lapel (with shift pattern as sticker on ashtray lid) to regular shift pattern lapel (early 1985 production)
-Change from light grey to anthracite headliner and trunk liner (early 1985 production)
-Introduction of optional BMW Sound System (11/85 production)
-Introduction of optional driver-side airbag (11/85 production)
-Introduction of different rear springs (2/86 production)
-Introduction of optional Shadowline (dechromed) exterior trim (5/86 production)
-Introduction of (optional in most markets) 16-inch cross-spoke alloy wheels (5/86 production)
-Introduction of Boge (in place of of Bilstein) shocks (approximately 10/86 production)
-Introduction of 25mm (front) and 18mm (rear) anti-roll bars (10/86 production)
-Introduction of map lights in rear-view mirror (10/86 production)
-Introduction of door sill plates with the “M5” logo (10/86 production)
Does every example of the E28 M5 utilize a “WBS” VIN prefix?
Starting with the E28 M5, all products from BMW Motorsport GmbH were assigned a “WBS” VIN prefix to distinguish them from the non-M BMW AG vehicles, which retained a “WBA” prefix. However, the first 26 left-hand drive ECE examples of the E28 M5 were produced with the regular WBA prefix.
Why do most sources list the total production of North American-spec M5s at 1,370 instead of 1,340?
Most sources (including BMW AG itself) list the total production of North American-spec E28 M5s (USA and Canada combined) at 1,370 units. However, this figure does not consider a major flaw in the BMW production database that lists 30 additional VINs which do not, in fact, actually exist. Thus, the accurate figure is 1,340.
Of the 1,340 North American-spec E28 M5s, how many were built to Canadian specification?
A total of 102 E28 M5s were built to Canadian specification, while the remaining 1,238 were built to U.S. specs. Aside from minor differences in instrumentation (imperial versus metric), U.S. and Canadian E28 M5s are identical.
Drivetrain
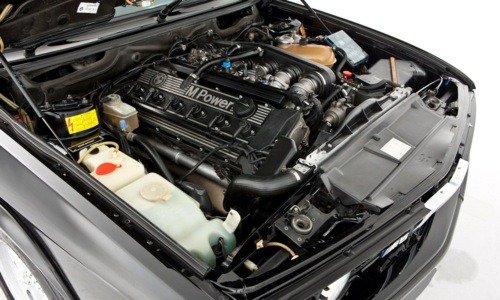
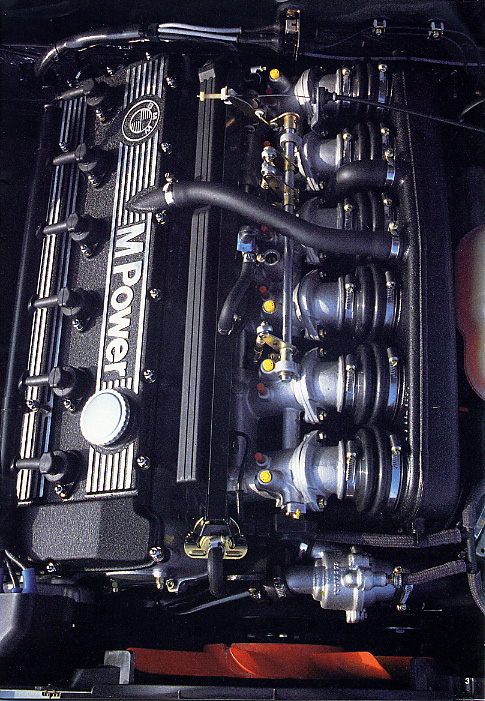
What makes the M88/S38 engine unique?
The M88 and S38 engines are evolutions of the 24-valve inline-six developed for the mid-engine M1 supercar. Like that engine, both the M88 and S38 share a displacement of 3,453cc (via a bore of 93.4mm and a stroke of 84mm), and both have a four-valve crossflow cylinder head (with 37mm inlet valves and 32mm exhaust valves) designed for better breathing at high rpm. However, for their application in the E28 M5, the M88 and S38 have unique pistons and connecting rods, as well as more advanced Bosch Motronic fuel injection/engine management. To save costs, both engines utilize the standard steel M30 crankshaft and wet-sump lubrication system. Many other smaller items, such as the ignition system, are shared with the regular 5 Series as well.
How do the M88 and S38 engines differ?
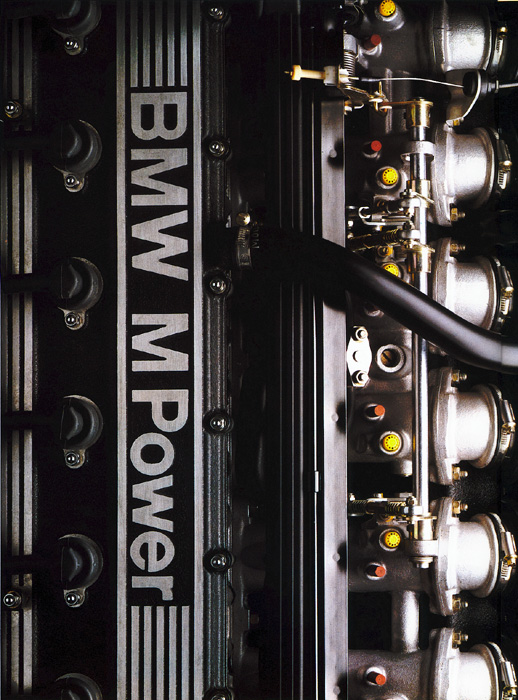
The M88 is the non-catalyst version of the S38 engine. With a 10.5:1 compression ratio, 264-degree camshafts, and a single-row timing chain, it is identical to the one found in the non-catalyst versions of the E24 M635CSi coupe. Power is rated at 286 hp (DIN) at 6,500 rpm with 251 lb/ft of torque at 4,500 rpm. The M88 can be identified by the BMW Roundel and only the words “M Power” on its valve cover.
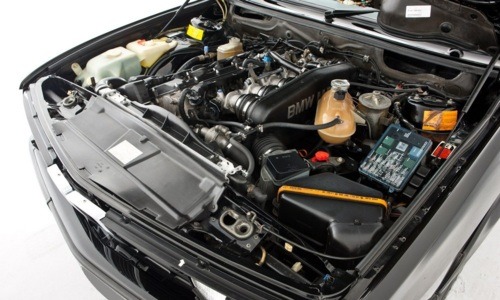
The S38 s the “clean” version of the M88 motor, introduced to allow E28 M5s sold in the United States and Canada to comply with North American emissions regulations. It utilizes a duplex (double-row) timing chain, 248-degree camshafts, and features a lower 9.8:1 compression designed to work with catalytic converters. This reduced the horsepower to 256 hp (SAE) or 260 hp (DIN) at 6,500 rpm and torque to 243 lb/ft at 4,500 rpm. The S38 can be identified by the words “BMW M Power” on its valve cover.
What kind of gearbox does the E28 M5 have?
All E28 M5s have the Getrag 280/5 five-speed manual gearbox. Gear ratios are as follows: 3.51 (1), 2.08 (2), 1.35 (3), 1.00 (4), .81 (5). A 3.73:1 final drive is fitted to all but the North American E28 M5, which uses a 3.91:1 rear end. All have limited slip differentials with a maximum locking of 25 percent.
Chassis
How is the suspension of the E28 M5 different from that of a standard 5 Series?
All M5s utilize the MacPherson strut/semi-trailing arm chassis design common to all E28 5 Series, though the suspension geometry has been altered and many components have been upgraded by BMW Motorsport in various ways, depending on the market and production date.
Up front, European-spec models produced before October of 1986 feature unique Bilstein shock inserts (shared only with the European-spec M635CSi) mounted to standard E28 struts, plus a 21mm anti-roll bar. However, beginning in October of 1986, the front shocks were updated to a different iteration from Boge (also specific to the M5) and the anti-roll bar was enlarged to 25mm. In the rear, European-spec M5 built before February of 1986 retained standard E28 components, including the springs, shocks (Bilstein) and a 14mm anti-roll bar. However, the M5 received unique rear springs beginning with February 1986 production, followed eight months later by a switch to Boge rear shocks and a larger 18mm rear anti-roll bar.
The chassis of the North American-spec E28 M5 is different from the European-spec version in a number of ways. Its front suspension contains standard springs (shared with the North American-spec E28 535i/535is and European-spec E28 M535i/E24 635CSi) and shocks (shared with the North American-spec E24 635CSi), though it did receive the 25mm anti-roll bar used on later European-spec M5s. The M5-specific rear springs and 18mm rear anti-roll bar are identical to those of later European-spec M5s. However, the North American model is further equipped with an automatic load-leveling system that is unique to this version within the entire E28 range.
What size brakes does the E28 M5 have?
The E28 M5 has enlarged vented front rotors that measure 11.8-inches (300mm) in diameter. These utilize four-piston calipers. The solid rear rotors are the same as those fitted to an E28 535i or M535i, measuring 11.2-inches (284mm) in diameter. ABS is standard.
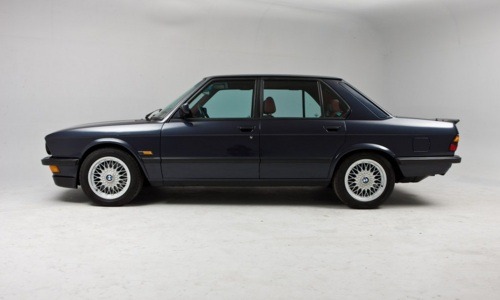
What wheels and tires were offered on the E28 M5?
Two different factory alloy wheels were available for the E28 M5. The majority of European-spec E28 M5s were equipped with metric-sized forged alloy wheels also used on some E23 7 Series and E24 6 Series models. These measure 195mm x 390mm and are shod with 220/55VR390 tires.
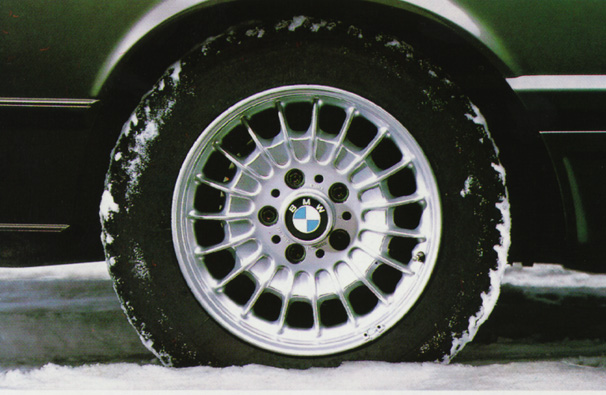
Later in production, the E28 M5 was also offered with7.5x16-inch cross-spoke alloy wheels carrying 225/50VR16 tires, usually Pirelli P700s. These wheels were introduced as an option on left-hand drive European-spec M5s starting in 9/86 (1987 model year), and were made standard on right-hand drive E28 M5s at the same time (though they were also offered as an option on UK-market M5s built before 9/86). All North American-spec E28 M5s, as well as those produced for South Africa, received these wheels as standard equipment.
Cosmetics
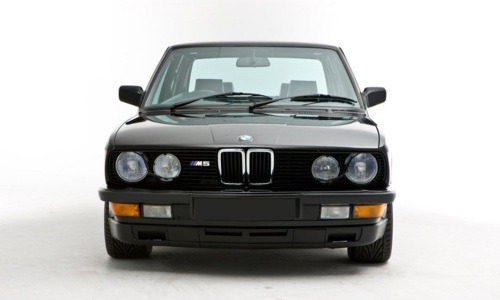
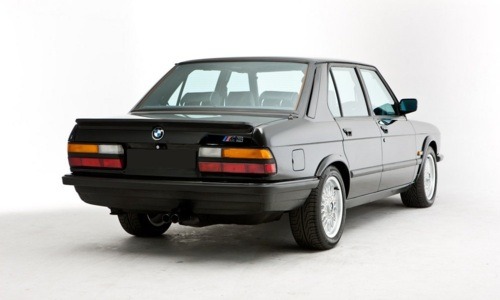
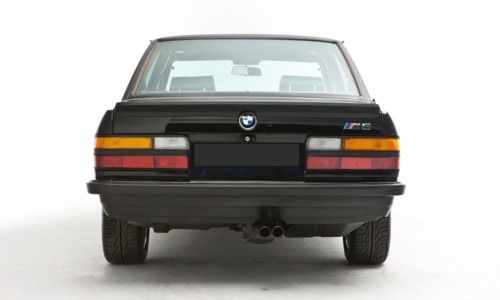
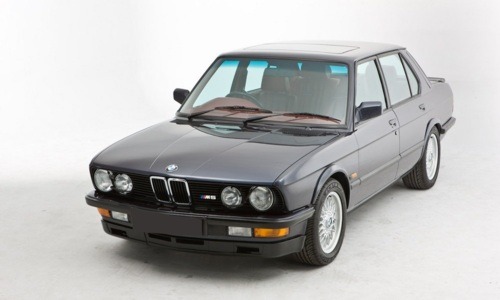
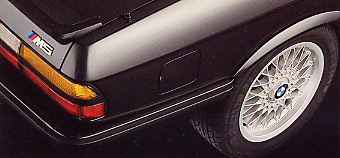
What distinguishes the exterior of a European-spec E28 M5 from that of a normal 5 Series?
Because the intention of BMW Motorsport was to hide the performance capabilities of the M5 within a standard-looking 5 Series body, there are few external items that differentiate the European-spec E28 M5 from any other E28 sedan. The only body panel that is unique is the black plastic front airdam, included to reduce front end lift at high speeds. There is also an M5-specific aerodynamic engine compartment undertray, body-color rear-view mirror housings and a pair of “M5” badges, one on the grille and another on the trunk-lid, though these could be omitted upon request (which was common).
Two different alloy wheels were offered on the E28 M5: A metric-sized version made of forged alloy (exclusive to the M5 within the E28 series but also offered on the E24 6 Series and E23 7 Series), as well as a unique 7.5x16-inch cross-spoke wheel (introduced for the 1987 model year) that also included body-color fender lip extensions. Shadowline (dechromed) exterior trim for the window surrounds, bumpers and side moldings was optional beginning with 4/86 production.
In most European markets, the M-Technic aerodynamic package (as fitted as standard to the E28 M535i) was offered as an option. This consisted of body-color extensions with ribbed trim (front bumper and lower airdam, side valance panels, rear bumper and lower diffuser), the M-technic rear spoiler and dechromed side moldings. This option could be ordered with or without Shadowline trim and was commonly (but not always) paired with the 16-inch cross-spoke alloy wheels and body-color fender lip extensions.
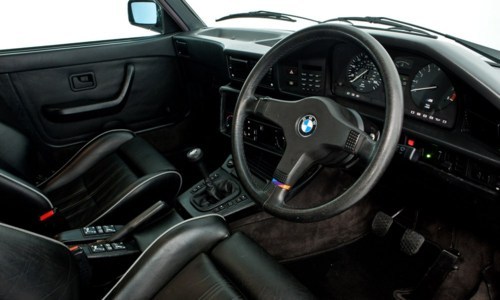
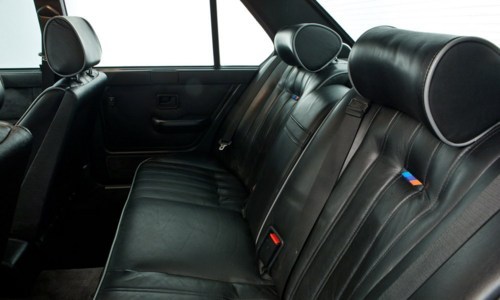
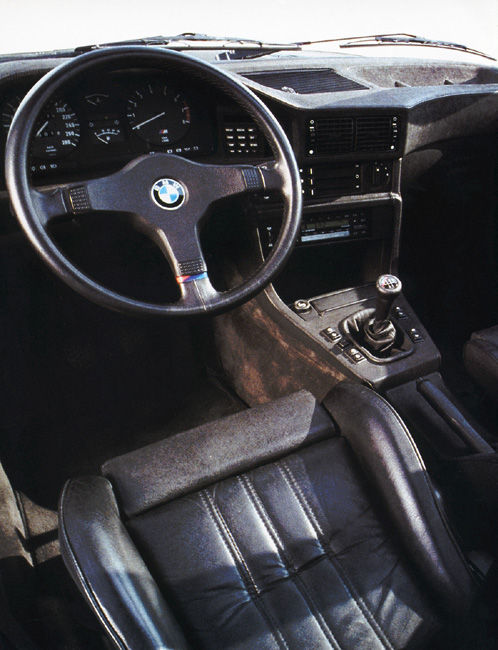
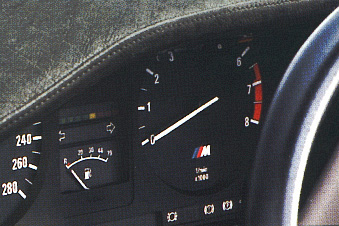
How is the interior of an E28 M5 different from that of a regular 5 Series?
Though identical in basic design and layout to that of any E28 5 Series, the interior of the E28 M5 is fitted with a few special items. All examples have a three-spoke M-Technic steering wheel also used in other BMW models. Most are also equipped with sport front seats, though a few were fitted with the standard “comfort” versions by request and some even had genuine Recaro front seats in place of the BMW items. In some markets, both the front and rear seats include an M tri-color stripe attached to a metal tag. On the earliest cars, the leather shift knob is topped with only an “M” logo. This was soon changed to a version with both the standard shift pattern and the tri-color M stripe. The instrument cluster contains a unique 280 kph/170 mph speedometer and a special tachometer with the M logo instead of an economy meter. A black headliner is exclusive to the M5 within the E28 range and later examples also have special door sill plates with the “M5” logo. Finally, the trunk of the E28 M5 is unique for four reasons. First, it contains the battery in a special right-side compartment, secured by one of two different covers, depending on the production date. Second, it is lined with a plush carpet. Third, with the exception of the earliest examples, the lining on the inside of the trunk lid is black instead of the usual light grey. Finally, there is a special cargo net to secure loose objectrs, though this also does not appear to have been fitted to the earliest cars.
What features were optional on the European-spec E28 M5?
Because the E28 M5 was assembled largely by hand at the BMW Motorsport facility, European customers could not only choose from the entire range of normal E28 options but also request more specialized features like hand-stitched complete leather interiors and/or integrated electronics such as phones, faxes, and minibars. Thus, depending on the market and production date, the E28 M5 could be very sparsely equipped or extremely luxurious. However, every E28 M5 features power front windows, power mirrors, central locking, and the Check Control vehicle function monitoring system. Options varied from market to market but generally included metallic paint, Shadowline (dechromed) exterior trim, headlight washer/wipers, leather upholstery (in various grades), air conditioning, the on-board computer II, power front seats, heated front seats, power sunroof, rear window sunshade, rear headrests and various audio systems.
How is a North American-spec E28 M5 cosmetically different from a Euro-spec E28 M5?
The North American-spec E28 M5 uses the same government-mandated sealed-beam headlights (all four of the same diameter) and 5-mph bumpers with integrated side marker lights as all U.S. and Canadian versions of the E28 5 Series. However, the M5 adds a special front airdam designed specifically for the North American front bumper as well as the M-Technic rear spoiler fitted as an option to some European-spec examples. Though these items are not unique to this model (both are also found on the E28 535is), the M5 can further be identified by its Shadowline trim, “M5” grille and trunk-lid badges plus the 16-inch cross-spoke alloy wheels.
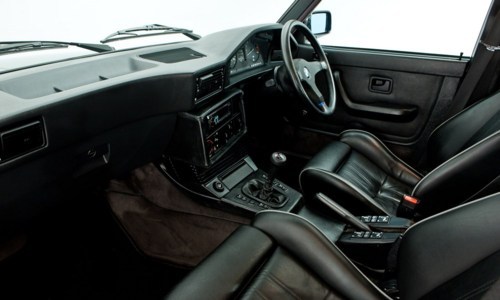
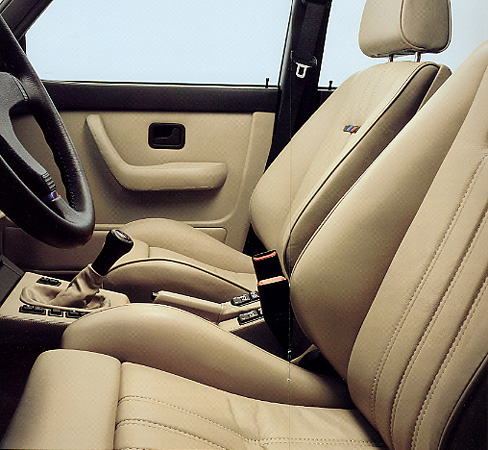
How is the interior of the North American E28 M5 different from that of the European version?
Unlike the wide variation of color, trim and equipment found in European-spec E28 M5s, all North Americans-spec interiors have Black or Natur leather sport seats, with additonal hide on the seats, center console, glovebox door and door pulls. In addition, all have the M tri-color seat stripes (front and rear) and “M5” door sill plates, while the carpeted trunk always features the black lid lining, cargo net, later-style battery box enclosure and left-side storage compartment. Standard equipment includes air conditioning, power seats, power sunroof, cruise control and an eight-speaker am/fm cassette stereo system. Heated front seats were the only factory option (standard in Canada)
Special Versions
Were there any special versions of the E28 M5?
There were no special editions of the German-built E28 M5. However, a limited run (96 cars) of M5s was assembled in South Africa exclusively for that market.
What distinguishes the South African E28 M5 from the German-built version?
The 96 right-hand drive E28 M5s produced for the South African market were assembled at the Rosslyn, South Africa factory using German-supplied Complete Knock Down (CKD) kits. The mechancal items are thus identical to those of the European-spec E28 M5.
Cosmeticaly, however, the South African E28 M5 is somewhat unique. All are equipped with the M-Technic body panels that could be ordered as an option in some European markets, as well as Shadowline trim and the 7.5x16-inch cross spoke alloy wheels. However the South African E28 M5s do not include the body-color fender lip extensions found on the German-built cars, nor were they offered with headlight washer/wipers. Also, because the South African E28 M5s were painted in the local paint shop, exterior colors were limited to five choices: Henna Red, Ice White, Cirrus Blue metallic, Delphin Gray metallic and Diamond Black metallic.
On the inside, all South African E28 M5s have essentially every normal 5 Series luxury item as standard, the only optional extra being a power sunroof. Unique to the South African version is a complete “Highline” Nappa leather interior normally offered only in E24 6 Series and E23 7 Series models. Available in four color choices (Lotus White, Natur, Midsilver and Indigo), the interior includes Nappa leather on the seats, door panels, center console, glovebox door, headliner, sun visors, upper door trim and dashboard. (NOTE: The passenger-side dashboard does not include the storage tray found on all German-built E28s.) The M tri-color insignias remain present on the front and rear seats. Finally, South African-spec models are not equipped with the black inner trunk lid liner used on all but the earliest German-built E28 M5s, though they do utilize the black trunk carpeting.
1985 BMW M5 Specifications
Source: http://classicandvintagebmw.tumblr.com/e28m5info
What makes the E28 M5 unique?
The E28 M5 is the BMW Motorsport-developed version of the E28 5 Series. It uses the M88 or S38 twin-cam 24-valve inline-six first introduced in the M1. It also has a BMW Motorsport-tuned chassis and a few special cosmetic pieces.
Where was the E28 M5 first introduced?
The M5 debuted at the 1985 Amsterdam Motor Show.
Where was the E28 M5 built?
Unlike the other E28 5 Series models, M5s were assembled by a small group of BMW Motorsport technicians who mated the drivetrain and interior trim with pre-painted bodies transported from the Dingolfing factory. This hand-assembly took place in one of two facilities, depending on the production date. E28 M5s produced before September of 1986 were assembled at BMW Motorsport’s original Preussenstrasse location near the BMW AG headquarters in Munich, while E28 M5s built beginning in 9/86 were assembled at the newly-opened BMW Motorsport headquarters in Garching, roughly 100 kms (60 miles) east of Munich. The only exceptions were M5s produced for the South African market, all of which were assembled at BMW’s Rosslyn, South Africa factory from German-supplied Complete Knock Down (CKD) kits.
Why was BMW sued by American E28 M5 owners?
When BMW of North America first anounced the E28 M5 in late 1986, production was said to be limited to 500 cars. But by the time production ended in November 1987, however, almost triple that number had been produced. Thus, a class action lawsuit was filed against BMW by E28 M5 owners who claimed that the collector’s value of their cars was diminished by the greater volume. The company settled the case by giving these owners a rebate on the purchase of a new BMW.
Why are all North American-spec E28 M5s officially 1988 models if the last example was made in 1987?
This was most likely a marketing decision. With the M5 originally intended to be a limited edition of 500 cars, and with the entire E28 range due to be replaced by the E34 for 1989, perhaps BMW of North America wanted to keep the E28 M5 exclusive by offering it only for the final 1988 model year. Also, it is worth noting that production of the other 1988 5 Series models began in early 1987, so the M5 preceeded these by only a few months.
Why are all North American E28 M5s essentially identical?
Because the E28 M5 was hand-assembled, yet needed to be manufactured for the North American market in relatively large numbers within a relatively short amount of time, BMW of North America was forced to limit the model’s specification to just two color schemes: Black (086) with a Natur (tan) leather interior and (officially for Canada only) Black (086) with a black leather interior.
Why is a North American E28 M5 with a black leather interior so rare?
Though a Natur (tan) extended leather interior was the only official interior color choice for the U.S. market, Canada insisited on giving E28 M5 buyers the second option of a black extended leather interior. The black interior option was later expanded to the U.S. market at the very end of E28 M5 production. In total, 102 E28 M5s with a black interior were produced for North America, of which 72 were built to Canadian specification and the rest to U.S. specification.
Production Data
How many versions of the E28 M5 were developed?
BMW Motorsport built four different versions of the E28 M5, three at the M works in Garching, Germany (European-spec in left-hand drive and right-hand drive, plus the North American version) and a South African-spec model for the home market assembled from Complete Knock Down (CKD) kits. Only the North American version utilized the catalyst-equipped S38 version of the M88 motor.
How many of each version were produced?
ECE (LHD without catalyst): 588 produced from 10/84 through 9/87
ECE (RHD without catalyst): 187 produced from 3/86 through 11/87
NA (LHD with catalyst): 1,340 produced from 11/86 through 11/87
SA (RHD without catalyst): 96 produced (assembled from CKD kits) from 6/87 through 11/88*
*Dates shown indicate final completion of vehicles assmebled in Rosslyn, South Africa.
What changes were made to the E28 M5 during its production?
Though all North American-spec E28 M5s are essentially identical, there were some alterations to the European-spec E28 M5 that occurred over the course of its production. These include:
-Change from “M” shift knob lapel (with shift pattern as sticker on ashtray lid) to regular shift pattern lapel (early 1985 production)
-Change from light grey to anthracite headliner and trunk liner (early 1985 production)
-Introduction of optional BMW Sound System (11/85 production)
-Introduction of optional driver-side airbag (11/85 production)
-Introduction of different rear springs (2/86 production)
-Introduction of optional Shadowline (dechromed) exterior trim (5/86 production)
-Introduction of (optional in most markets) 16-inch cross-spoke alloy wheels (5/86 production)
-Introduction of Boge (in place of of Bilstein) shocks (approximately 10/86 production)
-Introduction of 25mm (front) and 18mm (rear) anti-roll bars (10/86 production)
-Introduction of map lights in rear-view mirror (10/86 production)
-Introduction of door sill plates with the “M5” logo (10/86 production)
Starting with the E28 M5, all products from BMW Motorsport GmbH were assigned a “WBS” VIN prefix to distinguish them from the non-M BMW AG vehicles, which retained a “WBA” prefix. However, the first 26 left-hand drive ECE examples of the E28 M5 were produced with the regular WBA prefix.
Why do most sources list the total production of North American-spec M5s at 1,370 instead of 1,340?
Most sources (including BMW AG itself) list the total production of North American-spec E28 M5s (USA and Canada combined) at 1,370 units. However, this figure does not consider a major flaw in the BMW production database that lists 30 additional VINs which do not, in fact, actually exist. Thus, the accurate figure is 1,340.
Of the 1,340 North American-spec E28 M5s, how many were built to Canadian specification?
A total of 102 E28 M5s were built to Canadian specification, while the remaining 1,238 were built to U.S. specs. Aside from minor differences in instrumentation (imperial versus metric), U.S. and Canadian E28 M5s are identical.
Drivetrain
What makes the M88/S38 engine unique?
The M88 and S38 engines are evolutions of the 24-valve inline-six developed for the mid-engine M1 supercar. Like that engine, both the M88 and S38 share a displacement of 3,453cc (via a bore of 93.4mm and a stroke of 84mm), and both have a four-valve crossflow cylinder head (with 37mm inlet valves and 32mm exhaust valves) designed for better breathing at high rpm. However, for their application in the E28 M5, the M88 and S38 have unique pistons and connecting rods, as well as more advanced Bosch Motronic fuel injection/engine management. To save costs, both engines utilize the standard steel M30 crankshaft and wet-sump lubrication system. Many other smaller items, such as the ignition system, are shared with the regular 5 Series as well.
How do the M88 and S38 engines differ?
The M88 is the non-catalyst version of the S38 engine. With a 10.5:1 compression ratio, 264-degree camshafts, and a single-row timing chain, it is identical to the one found in the non-catalyst versions of the E24 M635CSi coupe. Power is rated at 286 hp (DIN) at 6,500 rpm with 251 lb/ft of torque at 4,500 rpm. The M88 can be identified by the BMW Roundel and only the words “M Power” on its valve cover.
The S38 s the “clean” version of the M88 motor, introduced to allow E28 M5s sold in the United States and Canada to comply with North American emissions regulations. It utilizes a duplex (double-row) timing chain, 248-degree camshafts, and features a lower 9.8:1 compression designed to work with catalytic converters. This reduced the horsepower to 256 hp (SAE) or 260 hp (DIN) at 6,500 rpm and torque to 243 lb/ft at 4,500 rpm. The S38 can be identified by the words “BMW M Power” on its valve cover.
What kind of gearbox does the E28 M5 have?
All E28 M5s have the Getrag 280/5 five-speed manual gearbox. Gear ratios are as follows: 3.51 (1), 2.08 (2), 1.35 (3), 1.00 (4), .81 (5). A 3.73:1 final drive is fitted to all but the North American E28 M5, which uses a 3.91:1 rear end. All have limited slip differentials with a maximum locking of 25 percent.
Chassis
How is the suspension of the E28 M5 different from that of a standard 5 Series?
All M5s utilize the MacPherson strut/semi-trailing arm chassis design common to all E28 5 Series, though the suspension geometry has been altered and many components have been upgraded by BMW Motorsport in various ways, depending on the market and production date.
Up front, European-spec models produced before October of 1986 feature unique Bilstein shock inserts (shared only with the European-spec M635CSi) mounted to standard E28 struts, plus a 21mm anti-roll bar. However, beginning in October of 1986, the front shocks were updated to a different iteration from Boge (also specific to the M5) and the anti-roll bar was enlarged to 25mm. In the rear, European-spec M5 built before February of 1986 retained standard E28 components, including the springs, shocks (Bilstein) and a 14mm anti-roll bar. However, the M5 received unique rear springs beginning with February 1986 production, followed eight months later by a switch to Boge rear shocks and a larger 18mm rear anti-roll bar.
The chassis of the North American-spec E28 M5 is different from the European-spec version in a number of ways. Its front suspension contains standard springs (shared with the North American-spec E28 535i/535is and European-spec E28 M535i/E24 635CSi) and shocks (shared with the North American-spec E24 635CSi), though it did receive the 25mm anti-roll bar used on later European-spec M5s. The M5-specific rear springs and 18mm rear anti-roll bar are identical to those of later European-spec M5s. However, the North American model is further equipped with an automatic load-leveling system that is unique to this version within the entire E28 range.
What size brakes does the E28 M5 have?
The E28 M5 has enlarged vented front rotors that measure 11.8-inches (300mm) in diameter. These utilize four-piston calipers. The solid rear rotors are the same as those fitted to an E28 535i or M535i, measuring 11.2-inches (284mm) in diameter. ABS is standard.
What wheels and tires were offered on the E28 M5?
Two different factory alloy wheels were available for the E28 M5. The majority of European-spec E28 M5s were equipped with metric-sized forged alloy wheels also used on some E23 7 Series and E24 6 Series models. These measure 195mm x 390mm and are shod with 220/55VR390 tires.
Later in production, the E28 M5 was also offered with7.5x16-inch cross-spoke alloy wheels carrying 225/50VR16 tires, usually Pirelli P700s. These wheels were introduced as an option on left-hand drive European-spec M5s starting in 9/86 (1987 model year), and were made standard on right-hand drive E28 M5s at the same time (though they were also offered as an option on UK-market M5s built before 9/86). All North American-spec E28 M5s, as well as those produced for South Africa, received these wheels as standard equipment.
Cosmetics
What distinguishes the exterior of a European-spec E28 M5 from that of a normal 5 Series?
Because the intention of BMW Motorsport was to hide the performance capabilities of the M5 within a standard-looking 5 Series body, there are few external items that differentiate the European-spec E28 M5 from any other E28 sedan. The only body panel that is unique is the black plastic front airdam, included to reduce front end lift at high speeds. There is also an M5-specific aerodynamic engine compartment undertray, body-color rear-view mirror housings and a pair of “M5” badges, one on the grille and another on the trunk-lid, though these could be omitted upon request (which was common).
Two different alloy wheels were offered on the E28 M5: A metric-sized version made of forged alloy (exclusive to the M5 within the E28 series but also offered on the E24 6 Series and E23 7 Series), as well as a unique 7.5x16-inch cross-spoke wheel (introduced for the 1987 model year) that also included body-color fender lip extensions. Shadowline (dechromed) exterior trim for the window surrounds, bumpers and side moldings was optional beginning with 4/86 production.
In most European markets, the M-Technic aerodynamic package (as fitted as standard to the E28 M535i) was offered as an option. This consisted of body-color extensions with ribbed trim (front bumper and lower airdam, side valance panels, rear bumper and lower diffuser), the M-technic rear spoiler and dechromed side moldings. This option could be ordered with or without Shadowline trim and was commonly (but not always) paired with the 16-inch cross-spoke alloy wheels and body-color fender lip extensions.
How is the interior of an E28 M5 different from that of a regular 5 Series?
Though identical in basic design and layout to that of any E28 5 Series, the interior of the E28 M5 is fitted with a few special items. All examples have a three-spoke M-Technic steering wheel also used in other BMW models. Most are also equipped with sport front seats, though a few were fitted with the standard “comfort” versions by request and some even had genuine Recaro front seats in place of the BMW items. In some markets, both the front and rear seats include an M tri-color stripe attached to a metal tag. On the earliest cars, the leather shift knob is topped with only an “M” logo. This was soon changed to a version with both the standard shift pattern and the tri-color M stripe. The instrument cluster contains a unique 280 kph/170 mph speedometer and a special tachometer with the M logo instead of an economy meter. A black headliner is exclusive to the M5 within the E28 range and later examples also have special door sill plates with the “M5” logo. Finally, the trunk of the E28 M5 is unique for four reasons. First, it contains the battery in a special right-side compartment, secured by one of two different covers, depending on the production date. Second, it is lined with a plush carpet. Third, with the exception of the earliest examples, the lining on the inside of the trunk lid is black instead of the usual light grey. Finally, there is a special cargo net to secure loose objectrs, though this also does not appear to have been fitted to the earliest cars.
What features were optional on the European-spec E28 M5?
Because the E28 M5 was assembled largely by hand at the BMW Motorsport facility, European customers could not only choose from the entire range of normal E28 options but also request more specialized features like hand-stitched complete leather interiors and/or integrated electronics such as phones, faxes, and minibars. Thus, depending on the market and production date, the E28 M5 could be very sparsely equipped or extremely luxurious. However, every E28 M5 features power front windows, power mirrors, central locking, and the Check Control vehicle function monitoring system. Options varied from market to market but generally included metallic paint, Shadowline (dechromed) exterior trim, headlight washer/wipers, leather upholstery (in various grades), air conditioning, the on-board computer II, power front seats, heated front seats, power sunroof, rear window sunshade, rear headrests and various audio systems.
How is a North American-spec E28 M5 cosmetically different from a Euro-spec E28 M5?
The North American-spec E28 M5 uses the same government-mandated sealed-beam headlights (all four of the same diameter) and 5-mph bumpers with integrated side marker lights as all U.S. and Canadian versions of the E28 5 Series. However, the M5 adds a special front airdam designed specifically for the North American front bumper as well as the M-Technic rear spoiler fitted as an option to some European-spec examples. Though these items are not unique to this model (both are also found on the E28 535is), the M5 can further be identified by its Shadowline trim, “M5” grille and trunk-lid badges plus the 16-inch cross-spoke alloy wheels.
How is the interior of the North American E28 M5 different from that of the European version?
Unlike the wide variation of color, trim and equipment found in European-spec E28 M5s, all North Americans-spec interiors have Black or Natur leather sport seats, with additonal hide on the seats, center console, glovebox door and door pulls. In addition, all have the M tri-color seat stripes (front and rear) and “M5” door sill plates, while the carpeted trunk always features the black lid lining, cargo net, later-style battery box enclosure and left-side storage compartment. Standard equipment includes air conditioning, power seats, power sunroof, cruise control and an eight-speaker am/fm cassette stereo system. Heated front seats were the only factory option (standard in Canada)
Special Versions
Were there any special versions of the E28 M5?
There were no special editions of the German-built E28 M5. However, a limited run (96 cars) of M5s was assembled in South Africa exclusively for that market.
What distinguishes the South African E28 M5 from the German-built version?
The 96 right-hand drive E28 M5s produced for the South African market were assembled at the Rosslyn, South Africa factory using German-supplied Complete Knock Down (CKD) kits. The mechancal items are thus identical to those of the European-spec E28 M5.
Cosmeticaly, however, the South African E28 M5 is somewhat unique. All are equipped with the M-Technic body panels that could be ordered as an option in some European markets, as well as Shadowline trim and the 7.5x16-inch cross spoke alloy wheels. However the South African E28 M5s do not include the body-color fender lip extensions found on the German-built cars, nor were they offered with headlight washer/wipers. Also, because the South African E28 M5s were painted in the local paint shop, exterior colors were limited to five choices: Henna Red, Ice White, Cirrus Blue metallic, Delphin Gray metallic and Diamond Black metallic.
On the inside, all South African E28 M5s have essentially every normal 5 Series luxury item as standard, the only optional extra being a power sunroof. Unique to the South African version is a complete “Highline” Nappa leather interior normally offered only in E24 6 Series and E23 7 Series models. Available in four color choices (Lotus White, Natur, Midsilver and Indigo), the interior includes Nappa leather on the seats, door panels, center console, glovebox door, headliner, sun visors, upper door trim and dashboard. (NOTE: The passenger-side dashboard does not include the storage tray found on all German-built E28s.) The M tri-color insignias remain present on the front and rear seats. Finally, South African-spec models are not equipped with the black inner trunk lid liner used on all but the earliest German-built E28 M5s, though they do utilize the black trunk carpeting.
1985 BMW M5 Specifications
Source: http://classicandvintagebmw.tumblr.com/e28m5info
Subscribe to:
Posts (Atom)